1. Feature Overview
The Data Purge feature allows you to automate a bulk deletion process of system & core activities, and custom activities from your account in a single action. This feature lets you efficiently manage your storage by systematically removing older data that your business no longer requires.
2. Prerequisites
- To enable this feature, contact your account manager, or write to support@leadsquared.com.
- You must be an admin to access this feature.
3. How It Works
- In the first step, create a create a data purge policy and select the activity type you want to delete.
- You can count the age of the activity based on the date it was created or modified.
- Select a date range (30 days, custom range, etc.) outside of which you want to delete this activity.
- Only activities created or modified outside the selected date range will be deleted.
- Activities modified within the date range will remain in your account.
- For example, suppose today’s date is April 30th and you want to delete the “Document Collection” activity, and you select a 30-day date range. In that case, only activities modified before April 1st (more than 30 days ago) will be deleted. Activities modified within the last 30 days, regardless of their creation date (such as a Document Collection activity posted on February 15th but modified on April 18th), will remain in your account.
- You can then select to purge activities created on leads or opportunities.
- You can schedule the purge frequency to be recurring and also select the date for the purge execution.
4. View Activity Distribution by Activity Type Report
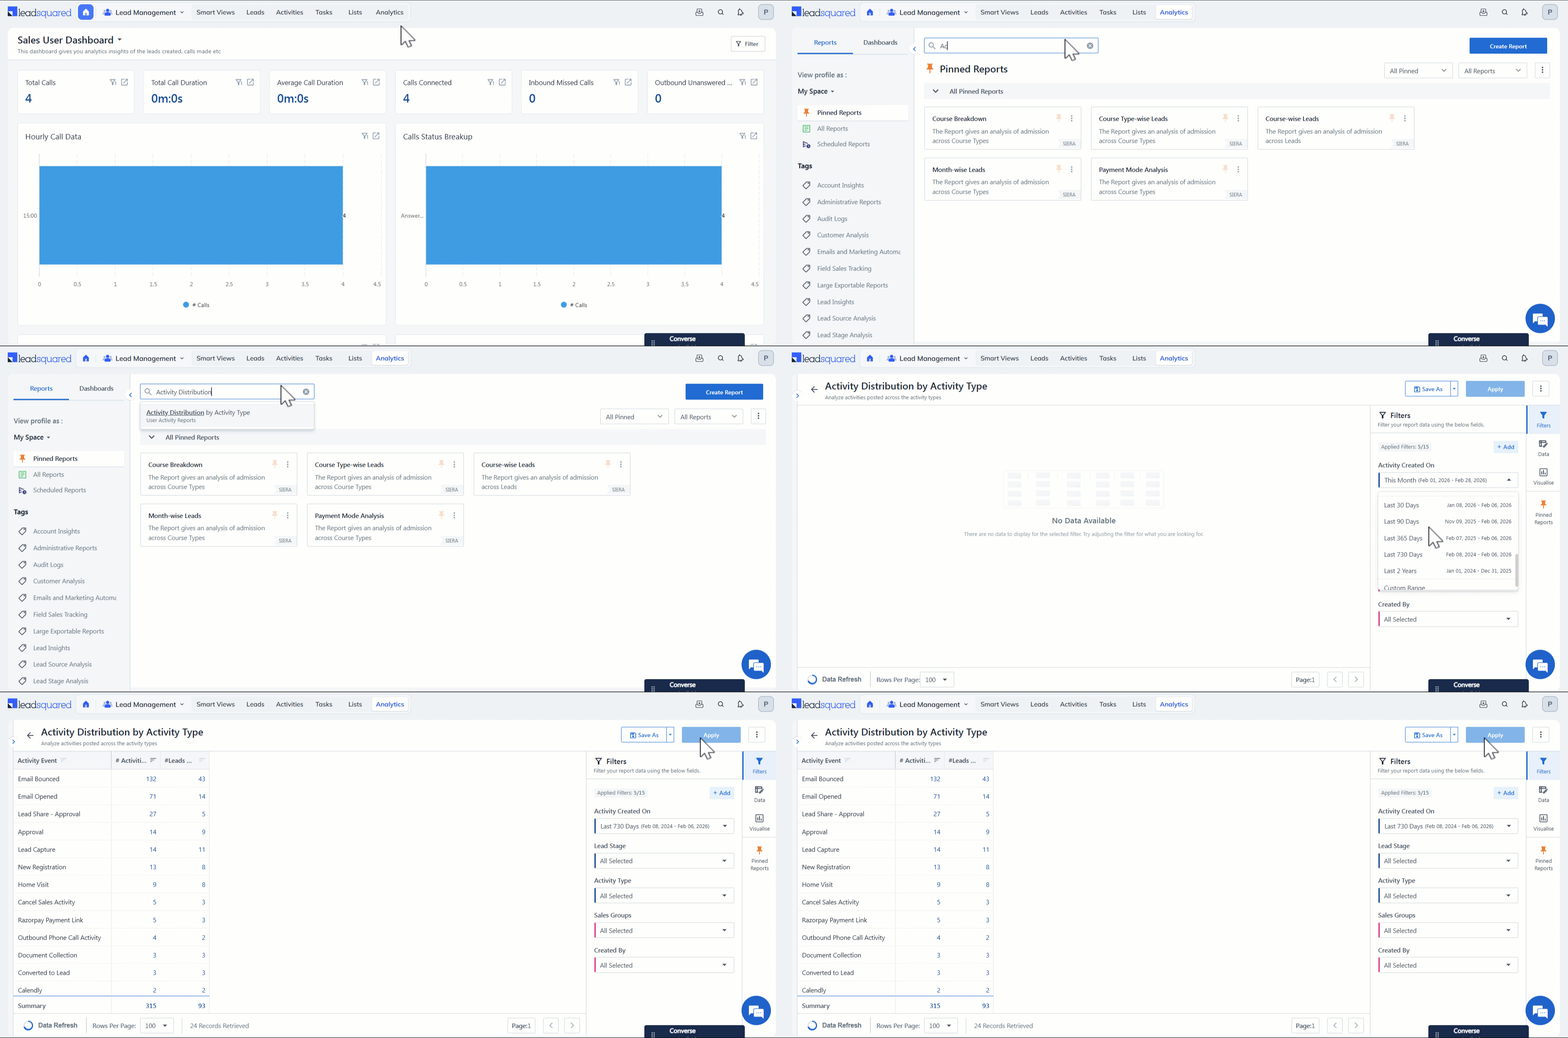
Before you create the data purge policy for activities, you can navigate to the Activity Distribution by Activity Type report and view the count of activities in each activity type. This helps you make better decisions and avoid mistakes.
- Navigate to Analytics from your LeadSquared Dashboard.
- In the search bar, look for “Activity Distribution by Activity Type”.
- In the report, under Activity Created On dropdown, select the relevant date range and click Apply. For instance, if today’s date is March 31, 2025 and you select Last 90 Days, all the activities created between January 1, 2025 and March 31, 2025 will be displayed.
5. Create a Data Purge Policy
To create a data purge policy –
- Navigate to My Profile>Settings>Data Management and Privacy>Data Purge Policy.
- On the Data Purge Policy grid, click Create.
- On the Data Purge Policy popup, under Select Entity dropdown, select Activity. The select the relevant activity you want to purge.
- Under Select Age Field for Counting Activity, select either Created On or Modified On depending on your requirements.
- From the Purge Activities with ‘Modified On’ date older than dropdown, select the date range for which you want to delete the activities. Only activities created or modified outside the selected date range will be deleted.
- For instance, if the current date is April 30th and you select 30 days, activities created or modified before April 1st will be deleted.*
- You can also select N Days and enter a custom date range to delete activities created or modified outside this range.
- Enable the Purge Activities Created on Lead to purge all the activities created on leads. Enable the Purge Activities Created on Opportunities to delete activities that are created on particular opportunity types.
Note:
- If you have Object Types enabled on your account, you can select to purge activities created on a particular Object Type instead of all leads in general.
- In the Enable the Purge Activities Created on Opportunities dropdown, if any opportunity type has an active purge policy, it will be greyed out.
<gif>
- On the Schedule tab in the popup, select the Purge Frequency:
- One-time: The data purge will be executed only once
- Recurring: The data purge will be executed in the selected frequency
- Then, select the data on which you want to execute the data purge. It can be the current day or any day within 30 days in the future.
- If you’ve selected the Purge Frequency as Recurring, then you must also select the date range to execute the policy.
- Once you’ve entered the relevant details, click Publish Purge Policy.
<gif>
On the Confirm popup –
- You’re shown a summary of what you’ve selected to be purged, which includes –
- The activity type you’ve selected
- Count of activities
- The data that will be deleted (All Activity field data, All Activity & CFS Attachments and All Activity Audit Trails)
- The date of execution
- Before proceeding with data deletion, click the checkbox.
- This is to confirm your understanding of region-specific compliance guidelines.
- Then, click Publish Purge Policy.
<gif>
6. Data Purge Policy Grid
After creating the policy, it will appear on the Bulk Delete Data Grid with the following details –
| Element | Description |
| Entity | Name of the activity |
| Request Type | Either recurring or one-time |
| Status | The status of the request –
|
| Created By | The name of the user who created the request |
| Last Run | The previous time the purge was performed |
| Next Run | The upcoming purge date |
<screenshot>
You can also perform the following actions from the actions grid –
<screenshot>
6.1 Edit Policy
6.2 Revoke
All policies are processed during off-business hours. You can revoke the policies you’ve made when it’s in the ‘Scheduled’ status.
- On the Data Purge Policy grid, under Actions, click the gear icon.
- Select Revoke, and on the Revoke Policy popup, click Yes, Revoke Policy. You can reactivate the policy any time.
<gif>
6.3 View Logs
View a summary of the purge activity with all the relevant details including the activity type, the date range, the records purged and the dates of the last and the next executions.
<screenshot>
7. Errors